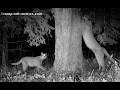
16 September 2024

Snowflake Monday

I'm often asked how I prevent designing the same snowflake more than once. I've redesigned many of my 837 (to date) snowflakes, and many have similarities. I don't know if I'd notice an identical duplicate unless someone pointed it out for me. :)

Duplicate names, however, are an entirely different story. I've been trying to draw from master lists of names I haven't used, but I guess I sometimes don't think to look up a potential new snowflake name on my Snowcatcher Snowflake Directory to make sure the name hasn't already been used before I publish a new pattern. I've accidentally created MANY duplicates, which I had to go back and number after discovering reuse, as well as many intentional duplicates, also designated by number (because Garden 27 Snowflake is much easier than coming up with a name, sometimes!!!).

And then there are all the mountain names duplicated on our state map. I've already created a Crystal Peak Snowflake; while researching today's mountain name, I discovered there is at least one more Crystal Peak, and it sits right next to today's 13,535-foot Treasure Mountain. (And while looking for a photo of that Crystal Peak, I found a third...) We have three Treasure Mountains. You'd think I'd have a photo of at least one of them! Nope!

The best I can do is share photos from our 2015 trip to nearby Crystal Mill, one of the top five most photographed landmarks in the US. I'm so thankful we were able to make that trip before Lizard was diagnosed with Parkinson's; no way I would have made it up that four-wheel-drive road without his driving skills. And I'm so thankful I was able to see the famed mill before scores of rude tourists succeeded in getting the general store and access to the most photogenic perch shut down last year. Due to unauthorized access and vandalism, there is talk of visibly fencing off (blockade style) the entire historic site, making it impossible for casual visitors to see it anymore. How sad that hiding this national treasure might be the only way to protect it now.

I went through six mountain names before settling for Treasure Mountain. I actually took the time to look up mountain names on my Snowflake Directory this time! Good thing, because those first six mountain names were already in use! Can you believe I can forget I've already used a name??? Treasure Mountain has a history all its own. It was named for a legendary and possibly non-existent buried gold stash that has never been found. The entire Crystal area is such a treasure; I hope visitors this year were more gentle and respectful so the area will be accessible for many generations to come. Wouldn't that be a treasure?

You may do whatever you'd like with snowflakes you make from this pattern, but you may not sell or republish the pattern. Thanks, and enjoy!

Finished Size: 7.75 inches from point to point
Materials: Size 10 crochet thread, size 7 crochet hook, empty pizza box, wax paper or plastic wrap, cellophane tape, water soluble school glue or desired stiffener, water, glitter, small container for glue/water mixture, paintbrush, stick pins that won't be used later for sewing, clear thread or fishing line

Treasure Mountain Snowflake Instructions

SPECIAL STITCHES:

Popcorn Stitch (pc)

Work 5 dc in designated st, take loop off hook, insert hook through top loop of 1st dc and replace loop on hook, pull loop through top of 1st dc.

Make magic ring.

Round 1: [Pc in ring, ch 3] 6 times; sl st in top of starting pc. Pull magic circle tight.

Round 2: 3 sc in each ch 3 sp around; sl st into top of starting Round 1 pc.

Round 3: Ch 4 (counts as 1 dc and [ch 2), sk next sc, in next sc work (1 dc, ch 15, 1 sc in 4th ch from hook and in each of next 7 ch, 1 hdc in each of next 2 ch, 1 dc in each of next 2 ch, 1 dc), ch 2, sk next sc, 1 fpdc around top of next pc] 6 times, omitting last fpdc of final repeat; sl st in 2nd ch of starting ch 4.
If you're not reading this pattern on Snowcatcher, you're not reading the designer's blog. Please go here to see the original.

Round 4: Ch 18 (counts as 1 fpdc and [ch 16), in next ch 3 tip work (1 sc, ch 5, 1 sc in 2nd ch from hook and in each of next 4 ch, 1 sc), working back down spoke ch 16, sk next ch 2 sp, 1 fpdc around next Round 3 fpdc] 6 times, omitting last fpdc of final repeat; sl st in 2nd ch of starting ch 18; bind off. Weave in ends.

Finish: I've been stiffening my flakes with undiluted, full-strength water soluble school glue for quite a while now, and I've been squishing the glue onto and throughout each flake with my fingers (yucky mess!!!) instead of gingerly painting the flakes with glue. Yes, it's a mess. But it's faster. And stiffer.

Tape wax paper or plastic wrap to top of empty pizza box. Pin snowflake to box on top of wax paper or plastic wrap.

If using glue, mix a few drops of water with a teaspoon of glue in small washable container. Paint snowflake with glue mixture or desired stiffener. Sprinkle lightly with glitter. Wash paintbrush and container thoroughly. Allow snowflake to dry at least 24 hours. Remove pins. Gently peel snowflake from wax paper or plastic wrap. Attach 10-inch clear thread to one spoke, weaving in end. Wrap fishing line around tree branch (or tape to ceiling or any overhead surface) and watch snowflake twirl freely whenever you walk by! Snowflake also may be taped to window or tied to doorknob or cabinet handle.

12 September 2024

A Quilt for Melody

My cute little niece is being blessed this weekend. I wish I could be there. On the bright side, her new quilt will be there!

I played thread chicken with this quilt four times and lost three. Why don't sewing machine manufacturers make larger bobbins?!? :)

I had fun piecing the binding for this quilt. If I'd had more time (I'm already more than two months late), I would have loved to piece the binding from the leftover charm squares. But the short edges of the coordinating solid fat quarter bundle looks pretty sharp, in my opinion.

Finally! I finished a quilt! I feel like it's been years since I finished a quilt. I looked it up, and Melody's cousin Evelyn got a fresh quilt from me back in March!!!Okay, so I'm very slowly getting back to being me!

10 September 2024

Hot Summer

I had my best pepper harvest ever this year, and I may not have to buy Hatch chilies to get us through the winter! Don't get me wrong; nothing better than fresh-roasted Hatch chilies. But roasting your own chilies in your own house makes your house smell fabulous for a couple of days, and no garden harvest is quite as satisfying as your own hot peppers!

09 September 2024

Snowflake Monday

Today's snowflake pattern celebrate's Lizard's desire to once again watch a hot air balloon being inflated and then actually hanging on and powering through to accomplish his goal!!!

One year ago, we went to the nighttime "glow" at the Labor Day Lift Off in Colorado Springs, a bit more than an hour from our home in normal traffic. There is no normal traffic on the weekend of a big event like the Lift Off. After too long a journey to reach the venue, we were able to find an unoccupied table along the lake just south of the actual launch site in the hopes of getting awesome nighttime reflection photos. We had brought dinner, and we enjoyed it while waiting for the sun to set. The "glow" was delayed by wind, and Lizard wasn't able to stay in the soon-crowded location more than a few minutes longer. I shot a few photos and one brief movie of the overall scene as we made our way back to the car. On the bright side, we didn't have to deal with traffic on the way home.

I didn't think we'd ever be able to watch balloons live in person again. So this year's event is a HUGE milestone. Lizard was able to tolerate the noise and the crowds just long enough for one balloon to launch. He kept telling me he would wait in the car so I could keep taking pictures. I told him being there with him to watch a balloon go up is all I need! We both hope we can keep doing this for many years!

You may do whatever you'd like with snowflakes you make from this pattern, but you may not sell or republish the pattern. Thanks, and enjoy!

Finished Size: 6.5 inches from point to point
Materials: Size 10 crochet thread, size 7 crochet hook, empty pizza box, wax paper or plastic wrap, cellophane tape, water soluble school glue or desired stiffener, water, glitter, small container for glue/water mixture, paintbrush, stick pins that won't be used later for sewing, clear thread or fishing line, optional 4- to 5-inch smooth

Aloft Snowflake Instructions

SPECIAL STITCHES:

Popcorn Stitch (pc)

Work 5 dc in designated st, take loop off hook, insert hook through top loop of 1st dc and replace loop on hook, pull loop through top of 1st dc.

Make magic ring.

Round 1: [Pc in ring, ch 12, 1 tr in 12th ch from hook] 6 times; sl st in top of starting pc. Pull magic circle tight.

Round 2: [In next ch 11 loop work (3 sc, 3 hdc, 3 dc, ch 3, 3 dc, 3 hdc, 3 sc)] 6 times; sl st in starting sc.
If you're not reading this pattern on Snowcatcher, you're not reading the designer's blog. Please go here to see the original.

Round 3: Ch 9 (counts as 1 dc and [ch 7), in next ch 3 tip work (2 dc, ch 3, 2 dc), ch 7, 1 dc in next gap between petals] 6 times, omitting last dc of final repeat; sl st in 2nd ch of starting ch 9.

Round 4: Ch 9 (counts as 1 dc and [ch 7), in next ch 3 tip work (1 dc, ch 5, 1 tr, ch 7, 1 tr, ch 5, 1 dc), ch 7, 1 fpdc around post of next joint dc] 6 times, omitting last fpdc of final repeat; sl st in 2nd ch of starting ch 9; bind off. Weave in ends.

Finish: I've been stiffening my flakes with undiluted, full-strength water soluble school glue for quite a while now, and I've been squishing the glue onto and throughout each flake with my fingers (yucky mess!!!) instead of gingerly painting the flakes with glue. Yes, it's a mess. But it's faster. And stiffer.

Tape wax paper or plastic wrap to top of empty pizza box. Pin snowflake to box on top of wax paper or plastic wrap.

If using glue, mix a few drops of water with a teaspoon of glue in small washable container. Paint snowflake with glue mixture or desired stiffener. Sprinkle lightly with glitter. Wash paintbrush and container thoroughly. Allow snowflake to dry at least 24 hours. Remove pins. Gently peel snowflake from wax paper or plastic wrap. Attach 10-inch clear thread to one spoke, weaving in end. Wrap fishing line around tree branch (or tape to ceiling or any overhead surface) and watch snowflake twirl freely whenever you walk by! Snowflake also may be taped to window or tied to doorknob or cabinet handle.

03 September 2024

Holey Rhubarb!

Some really big leaves popped up in the lower level of one of my raised bed gardens this summer. I hadn't planted anything there. I assumed it was a weed. Things were so busy, I didn't bother pulling it.

My dear friend Sue from Mr. Micawber's Recipe for Happiness educated me. Once you have a rhubarb plant, you have rhubarb for life. That suits Lizard just fine; strawberry rhubarb pie is one of his favorite deserts.

I assume some critter planted the rhubarb for me, perhaps a bird, but I guess it could have been a racoon or squirrel. Whatever planted it didn't come back to eat it. We have had more than our fair share of grasshoppers this year, and they have stripped my salad greens to the stalks. Made a mess of a few peppers, too. I keep finding chew spots on the giant rhubarb leaves, and I assume they come from our ranch of grasshoppers. Perhaps that's helping keep the numbers less than what it could be. One leaf bite, and no more grasshopper...

The rhubarb is definitely a photogenic plant. I've read new leaves look like green brains. So I keep trying to get photos, but the leaves grow and spread out too fast. I think the stalks are beautiful when they turn red.

I finally worked up the courage to snip a few stalks. If I was still natural dyeing, those giant leaves likely would produce some wonderful spring shades on yarn. For now, I'm just composting them, but not for the vegetable garden.

I bought a big container of strawberries (because I've never been successful in growing my own), then chopped them and the rhubarb stalks. I put them in a glass casserole dish with about a quarter cup of agave syrup. I baked for 45 minutes.

Lizard enjoyed the jam-like concoction warm out of the oven with French vanilla ice cream. I also put some in our plain yogurt, and I froze the rest.

I had never tasted rhubarb. Now I'm as hooked as Lizard. I might even start buying rhubarb from the grocery store when I'm not growing my own!

Related Posts with Thumbnails